Computer- controlled cutting//

Tracing a bitmap in inskape
The first step was the tracing of an existed bitmap.The bitmam was the logo of my personal webspage for fablab academy. After the tracing command, the traced image was modified in terms of fill and strokes(no fill, black stroke 0.025 mm). The final outcome was a stencil that was saved into svg file. Two vinyl papers(a black and an orange)were placed on a sticky paper and were imported into the vinyl cutter
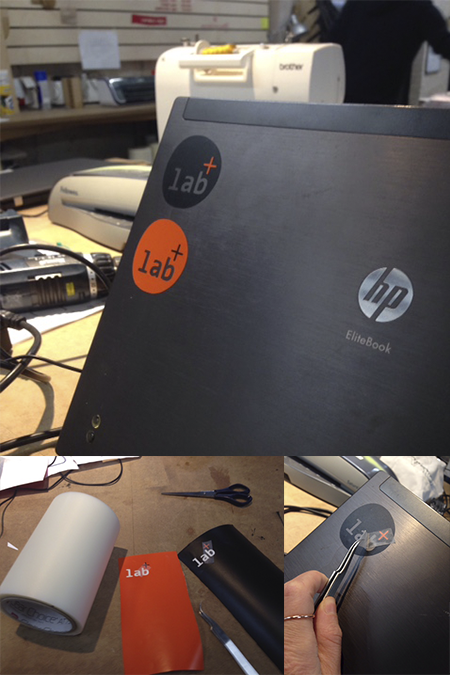
Vinyl stencil/sticker of mixed colors
After cutting the same design on orange and black vinyl, a protective transparent sticker were placed into them in order to trasfer and stick them without losing small elements. Before this, elements from two different colors were mixed. The final sticker was trasfered to a laptop's surface were finally the protective sticker was removed.
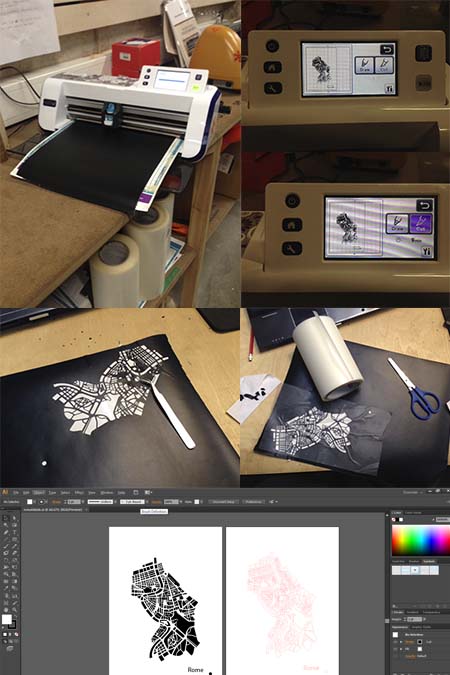
Vinyl stencil of a map sticker
The same procedure were followed also with the difference that the original file was created in illustrator. After was saved in svg (there is also the choice to import it into brother's scan'n'cut canvas online software for further editing) was cut and trasferred also by using a transparent protective tape. The power of the vinyl's cutter knife was on 2 and the procedure sequence was import mat-cut-saved data/cut-enter.
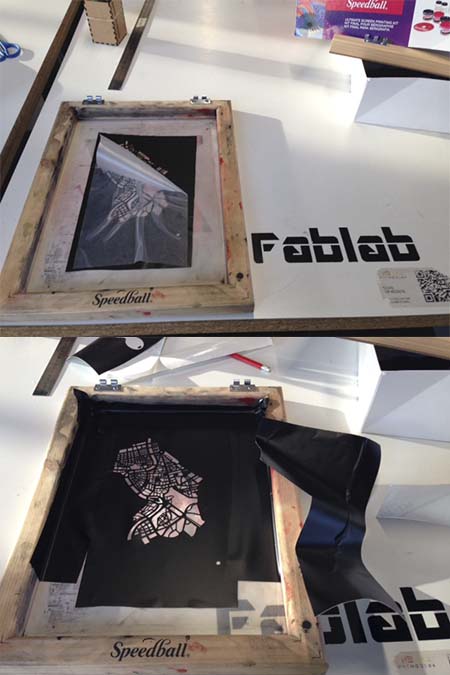
Preparation for screen printing
The vinyl stickers can be used to screen printing since they are waterproof and flexible. After transferring the vinyl paper (by using always a protective tape) to the special textile screen printing which is made by wood and silk textile, a canvas bag were placed under. The tape was removed and the rest of the screen was cover ny leftovers of vinyl paper in order to create a mask. The uncover parts will be imprinted to the canvas bag through the silk textile.
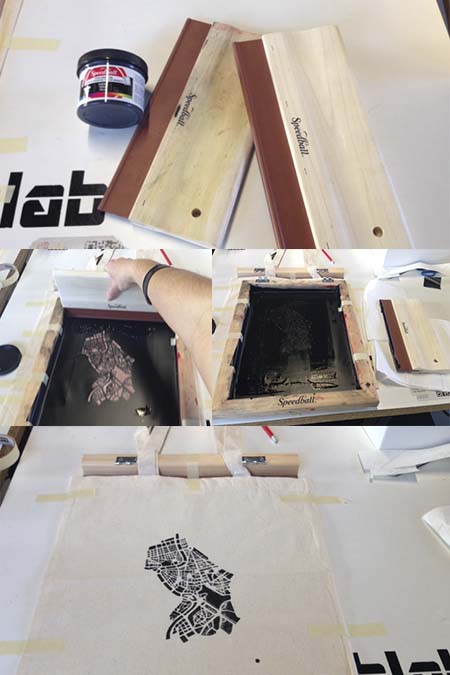
Textile screen printing
After the preparation of the mask is very important to use the right tools and ways. All the system should remain still and precise and a lot of textile ink should be placed on the mask paper. The round squeezer/spatula profile is the most appropriate for textiles and after a couple of times of strong pressure of the ink on the mask the vinyl mask should be removed carefully. After the end of the procedure the small vinyl mask can be washed and used again.
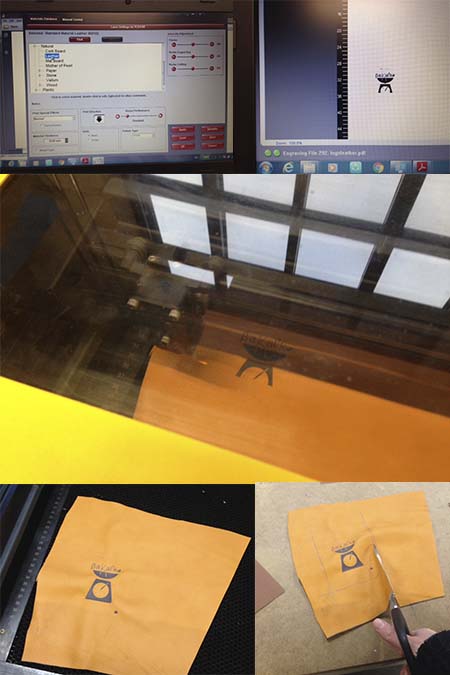
Leather laser engraving
Leather laser engraving can be very challenging and beatiful the same time. After calculating the right settings of material, power, speed and ppi (power:17.8%, speed:100% , PP1:500 ) a small piece of synthetic leather was placed on the laser mashine. The drawing was resized and replaced to the right place and the magic started. The outcome was fantastic but using a non-synthetic leather could be a suggestion since the laser shrunk a bit the leather surface.
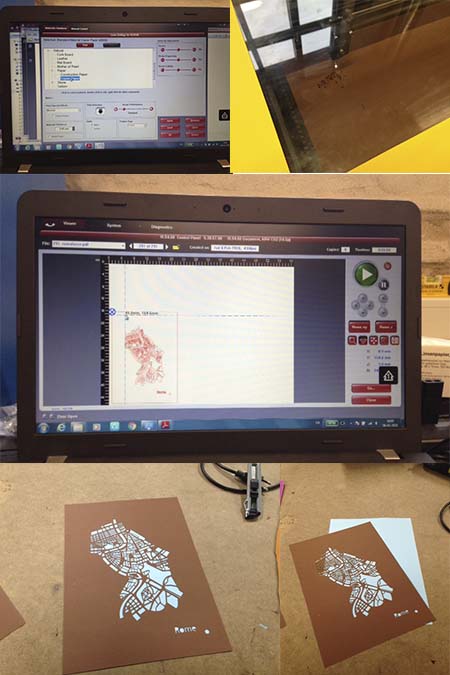
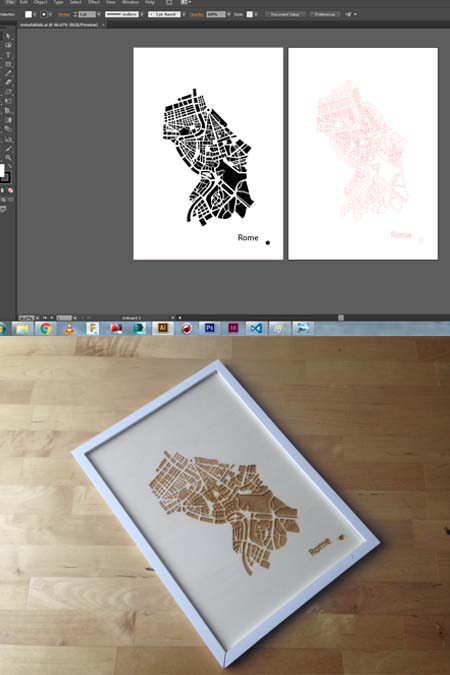
Paper laser cutting
A map of Rome was designed in illustrator and imported into the Ucp laser software on order to be laser cut. The illustrator file (fill none, stroke 0.001 and rgb red (255,0,0)) was exported into pdf and was sent to printer in order to calculate the right settings (material:natural/paper, power:50% , speed:100% , PPI:500 ). A thin paper was placed on the laser machine and after repositioning the result was a paper stencil that was placed on the top of another colorful paper.
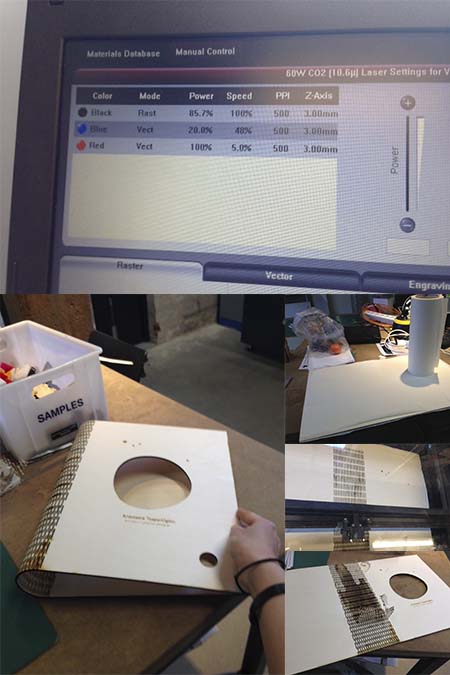
Wood laser engraving and cutting
In this case was used a combination of cutting and engraving to wood. The file was designed and prepared in illustrator with the right settings( cutting,non fill, stroke 0.001 pt and red rgb, engraving fill:balck rgf, non stroke) and was saved as a pdf. The wooden plate was covered by a protective white tape which protects from the laser smoke stains.The paper was rempoved after the laser cutting. The laser cutting and engraving settings were material: hard hood, power: ,speed, PPI: .
Wooden folder, curved wood
This curved laser bent wooden folder was created in illustrator (the same way as the rest of the items above) and laser cut in the laser machine. It was used a pattern that allows the wood to bend and is the most common lattice hinge and the most reliable. Lattice hinges rely on torsion of the material to bend and it's easy to see in this photo. The radius of the bend depends on the length of the cuts, the distance between them and the thickness of the material(the instructables/curved laser bend wood )
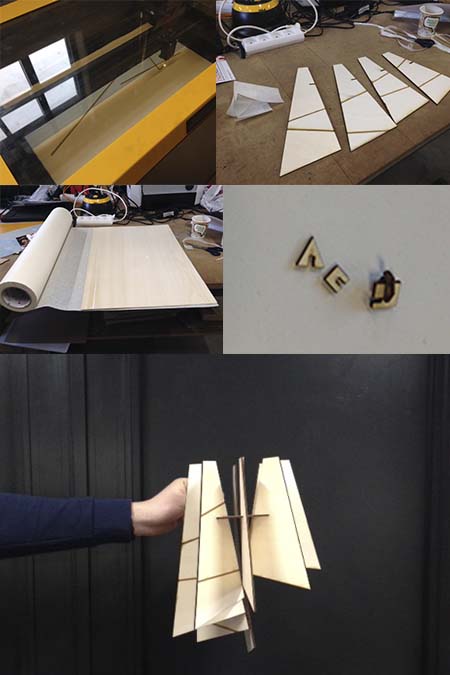
Press fit lamp
This press fit construction was designed in illustrator and in fusion 360. There was used two wooden plates 60cm and 40 cm, which were covered by protective tape in order to avoid the laser smoke stains. The settings of the laser mashine were exactly the same as the previous examples. The press fit holes were tested in advance and after two trials the right dimentions were 0.25 cm.
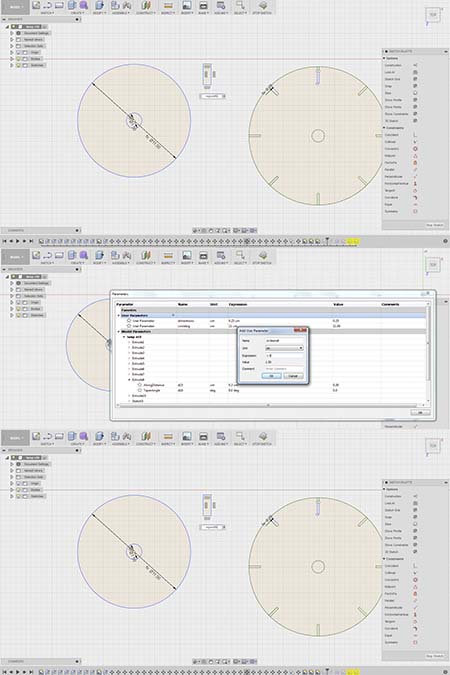
Parametric design
The design of the press fit construction was created in fusion 360 by using parametrical design. First,parameters of the width, lenght and two circles were created. After,similar dimentions were given the same value throught the parametetrical panel.In this way everytime the parameter changes from the panel , same elements with same values change automatically. The first attempt did not work smoothly since the imported drawing form inskkape had already a lot of constrains and the program was not responding. Finally, a new shape, identical to the first one was created and was refered to the parameters.
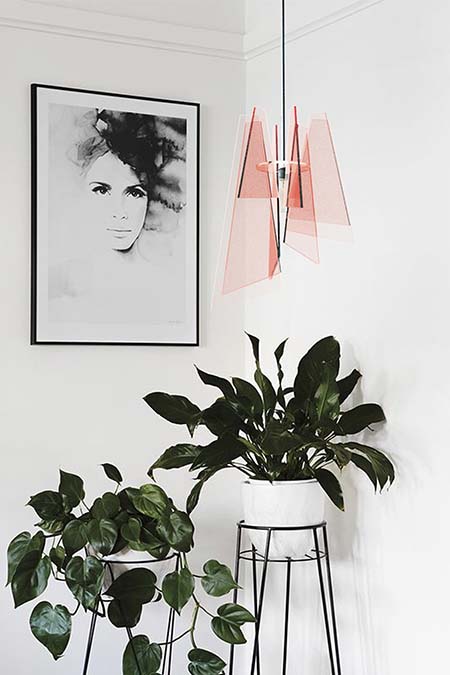
Plexi lamp design. Photocollage
This pop style lamp consists of eight different profiles and a circular part which keeps the whole construction. The profiles are different in terms of height and they are placed into the right parts of the circle.Is a light construction which can be (dis)amounted multiply times.
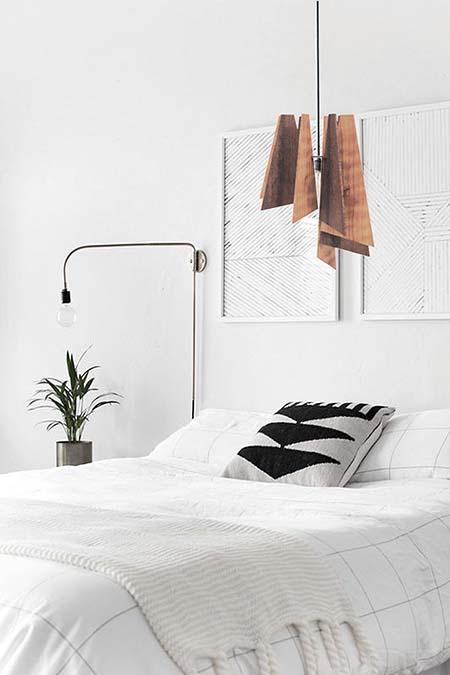
Wooden lamp design. Photocollage
The concept of this design is to break the symmetry, by terms of dynamics and lighting. The way it is made promotes the DIY philosophy and the digital fabrication way!
Technical specifications//
HOW I MADE A STICKER IN THE LASER CUTTER//Step 1_Create the file in illustrator/inskape and save it as an svg file. Step 2_ Save the file into an us file and turn on the brother vinyl cutter. Step 3_ insert the mat in the mashine byt pressign the insert button. The paper mat should be straight and well preserved. Step 4_ Throught the navigation screen go to cut -> usb -> navigate through your files and choose your svg file. Step 5_Use the touch screen to place the file exactly in the position that you like and delete the parts that you do not want. Step 6_ Press the cut button in the touch screen and check how many minutes it takes. Step 7_ Press ok and wait while the scan 'n' cut is cutting the file. Step 8_ when the cut is over press the insert/ remove button and remove the paper mat from the mashine. Step 9_ control the knife according to the vinyl/material that you want to cut. In case of simple vinyl the knife was set in 2. It can be changed from by removing it by the knife case, turning the knife into the right degree and placing it back to the case.
HOW I ENGRAVED ON LEATHER//Step 1_ Design the file in 2d in illustrator/inskape.The design item should have no stroke and black fill.Export it as a pdf. Step 2_Turn on the universal VLS 4.60 laser cutter and import the file with a usb. Open the file and press the properties button. In fablab spinderihallerne the laser cutter is connected automatically with the laser cutter's software and as soon as you send the file as for printing the laser cutter software opens.Step 3_ choose the width of the materials. Step 4_ choose the right settings for engraving. The specific laser cutter reads black fill as the engraving area. So we need to give the right settings like power, speed and ppi (power:17.8%, speed:100% , PP1:500 ).Step 5_ As soon as we have the right settings press, set -> apply -> ok. Step 6_ A second software opens and from here we can place the file in the right position . This canvas is a simulation of the laser cutter area. We can move and calculate how long the cut is gonna take. Step 7_ Turn on the ventilation, and press the paly button.
HOW I ENGRAVE AND CUT WOOD//Step 1_Design the file in 2d in illustrator/inskape.The design item should have no stroke and black fill for the parts that we want to be engraved and should have a red rgb line of 0.001 pt (in illustrator)for the cut outline. Export it as a pdf.Step 2_Turn on the universal VLS 4.60 laser cutter and import the file with a usb.In fablab spinderihallerne the laser cutter is connected automatically with the laser cutter's software and as soon as you send the file as for printing the laser cutter software opens.Step 3_ choose the width of the materials.Step 4_ choose the right settings for engraving.The specific laser cutter reads black fill as the engraving area and red rgb color for the cutting outline.So we need to give the right settings like power, speed and ppi. For the engraving is black: (power:85.7%, speed:100% , PP1:500)and red cut:(power:100%, speed:5% , PP1:500).Step 5_ As soon as we have the right settings press, set -> apply -> ok.Step 6_ A second software opens and from here we can place the file in the right position . This canvas is a simulation of the laser cutter area. We can move and calculate how long the cut is gonna take. Step 7_ Turn on the ventilation, and press the paly button.
Conclusions//
The conclusion of this week is that testing and retrying is the cornerstone of digital fabrication. The materialization is also a strong part since every material requires different treatment and different settings.
Links//
Brother vinyl cutter, Laser cutter,Universal VLS 4.60,